How to scrape Google Transparency reports
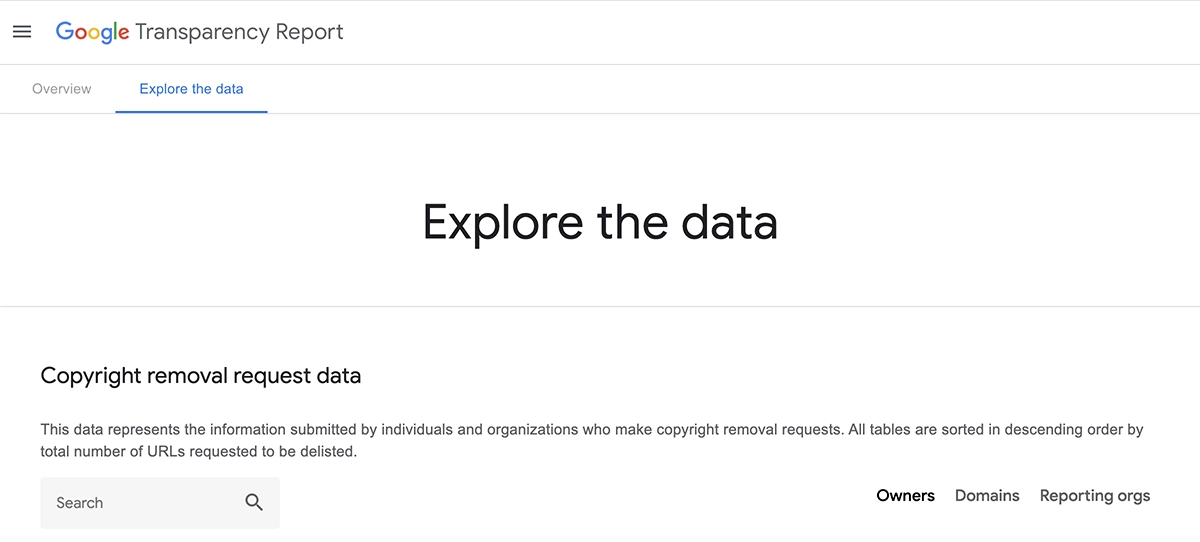
The Copyright section of the Google Transparency Report provides users insights into URLs removed from Google Search due to copyright infringement. It's possible to scrape and extract information about the flagged content, the entities requesting removal, and the reasons for delisting.
In this guide, you'll learn how to scrape copyright data from these reports into a Google Sheet using two web scrapers:
- The first web scraper will input search terms, extract links to "Copyright Owners," and save them to a Google Sheet.
- The second web scraper will process the extracted links by visiting the pages, extracting data for "Specified Domains" and "Reporting Organizations," and writing this information into the same or another Google Sheet.
Click to download the first and second template featured in this guide. This template was correct at the time of creation but may require updating or customization to suit your specific use case. If you’re unsure how to upload it, watch this video.
# Getting started
To begin, create a Google Sheet and add search terms to input into the "Search" field.
- Create a new Google Sheet: If you're logged into Google, type
sheet.newin your browser to quickly create a new sheet. - Set up tab one: Add your search terms to the first tab.
- Set up tab two: Name this second tab "Copyright Owners."
- Set up tab three: Name this third tab "Domain and Reporting Data."
# How to build a web scraper to extract 'copyright owners'
This web scraper extracts data from the Copyright Removal Request Data (opens new window) search page. The bot inputs search terms and extracts links to "Copyright Owners," saving them to a Google Sheet. To get started, open Axiom.ai and click "New automation" to use the no-code bot builder for creating the Google scraper. Then, click "Add first step" to begin.
Download the template we created for this scraper. Click to learn how to upload it.
- Add a Read data from a Google Sheet’ step and configure.
- Spreadsheet: Search for the Google Sheet you created in the "Spreadsheet" field. Once found, click to select.
- Sheet name: Choose a sheet tab or leave blank to use the first tab.
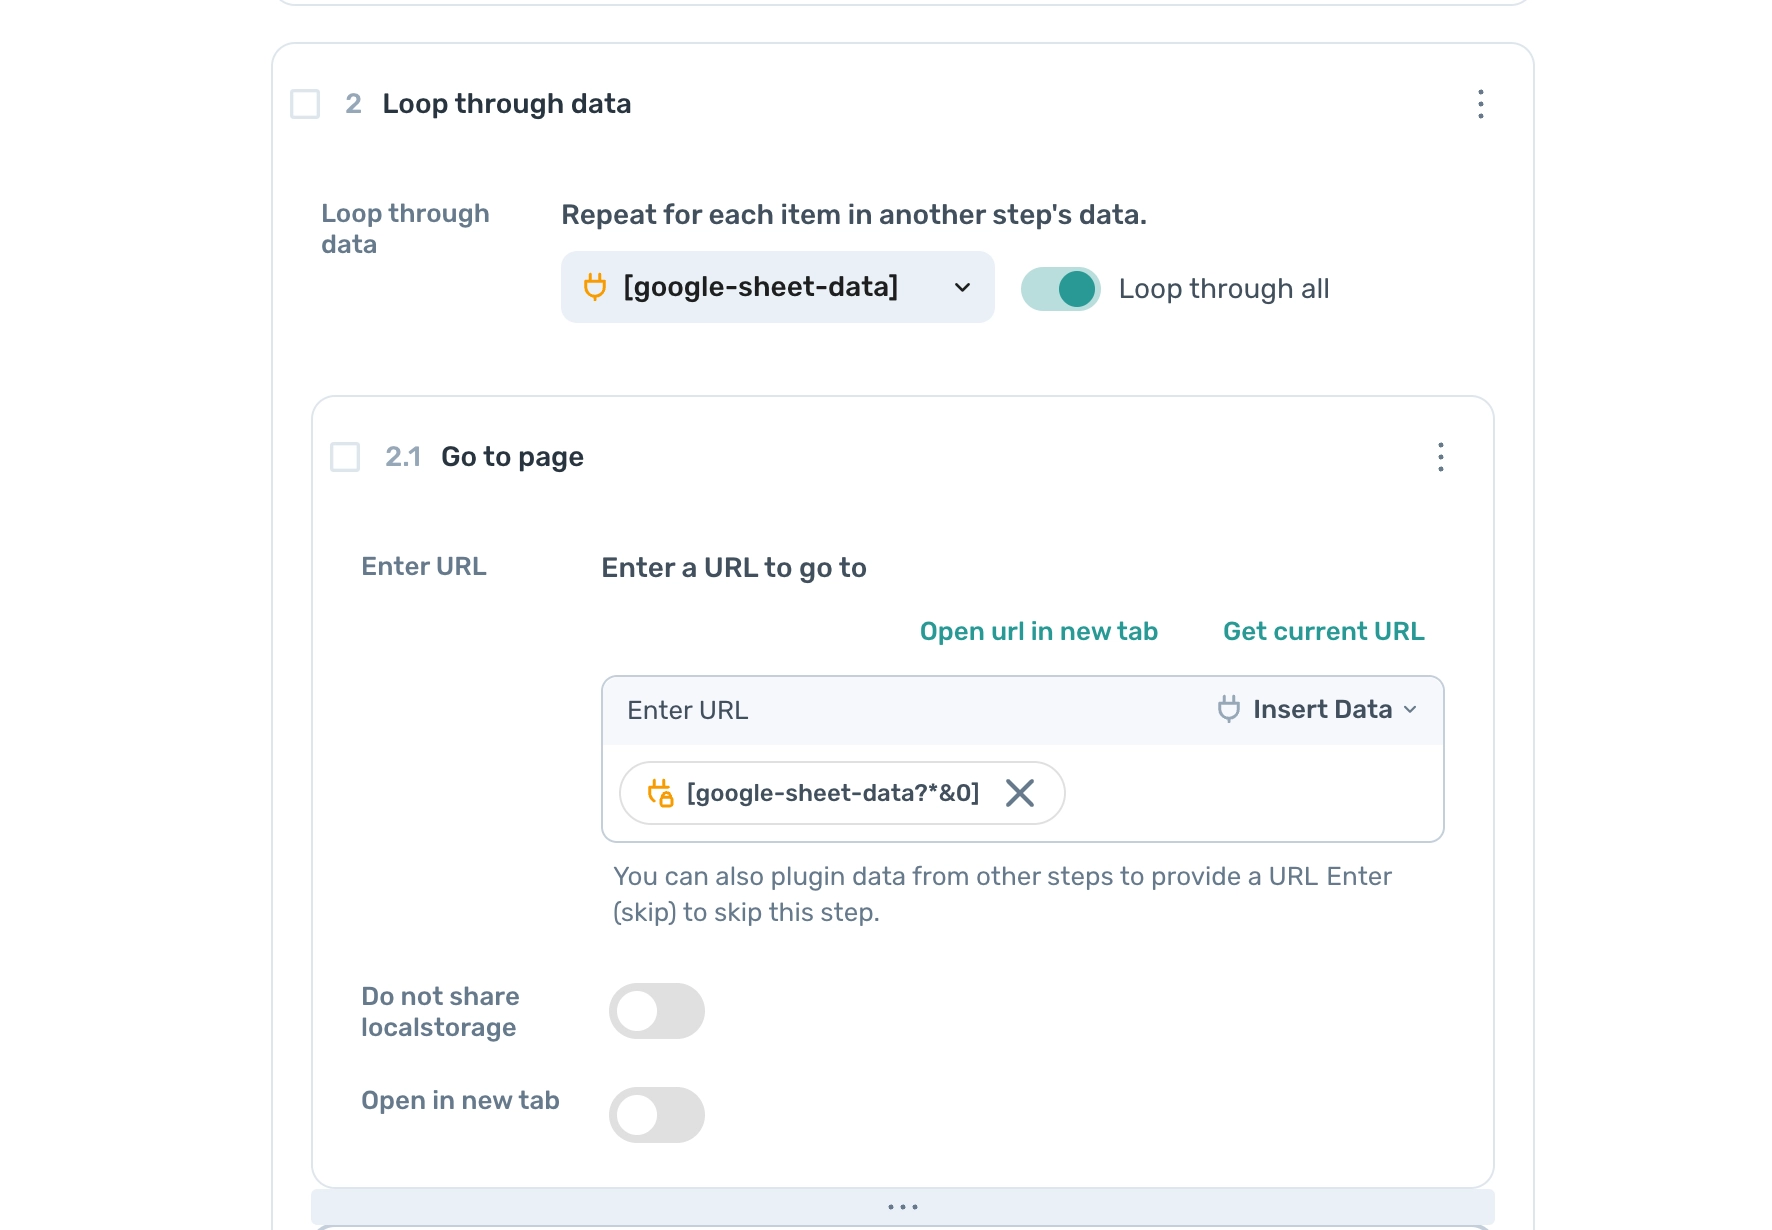
- Add a ‘Go to page’ step to load the Google Reports page.
- Enter URL: Insert this URL (opens new window).
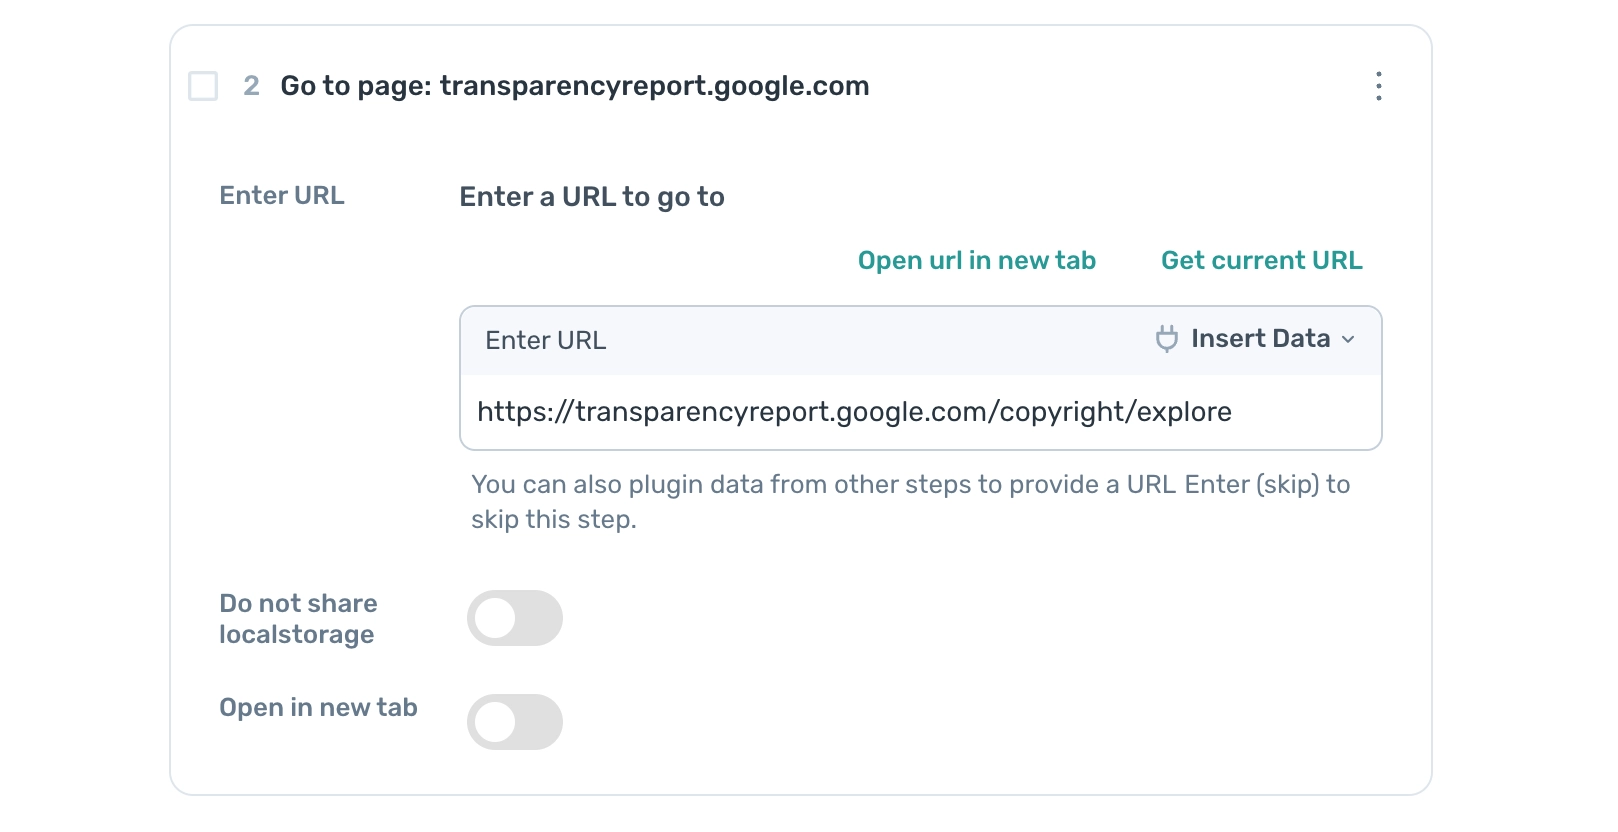
- Enter URL: Insert this URL (opens new window).
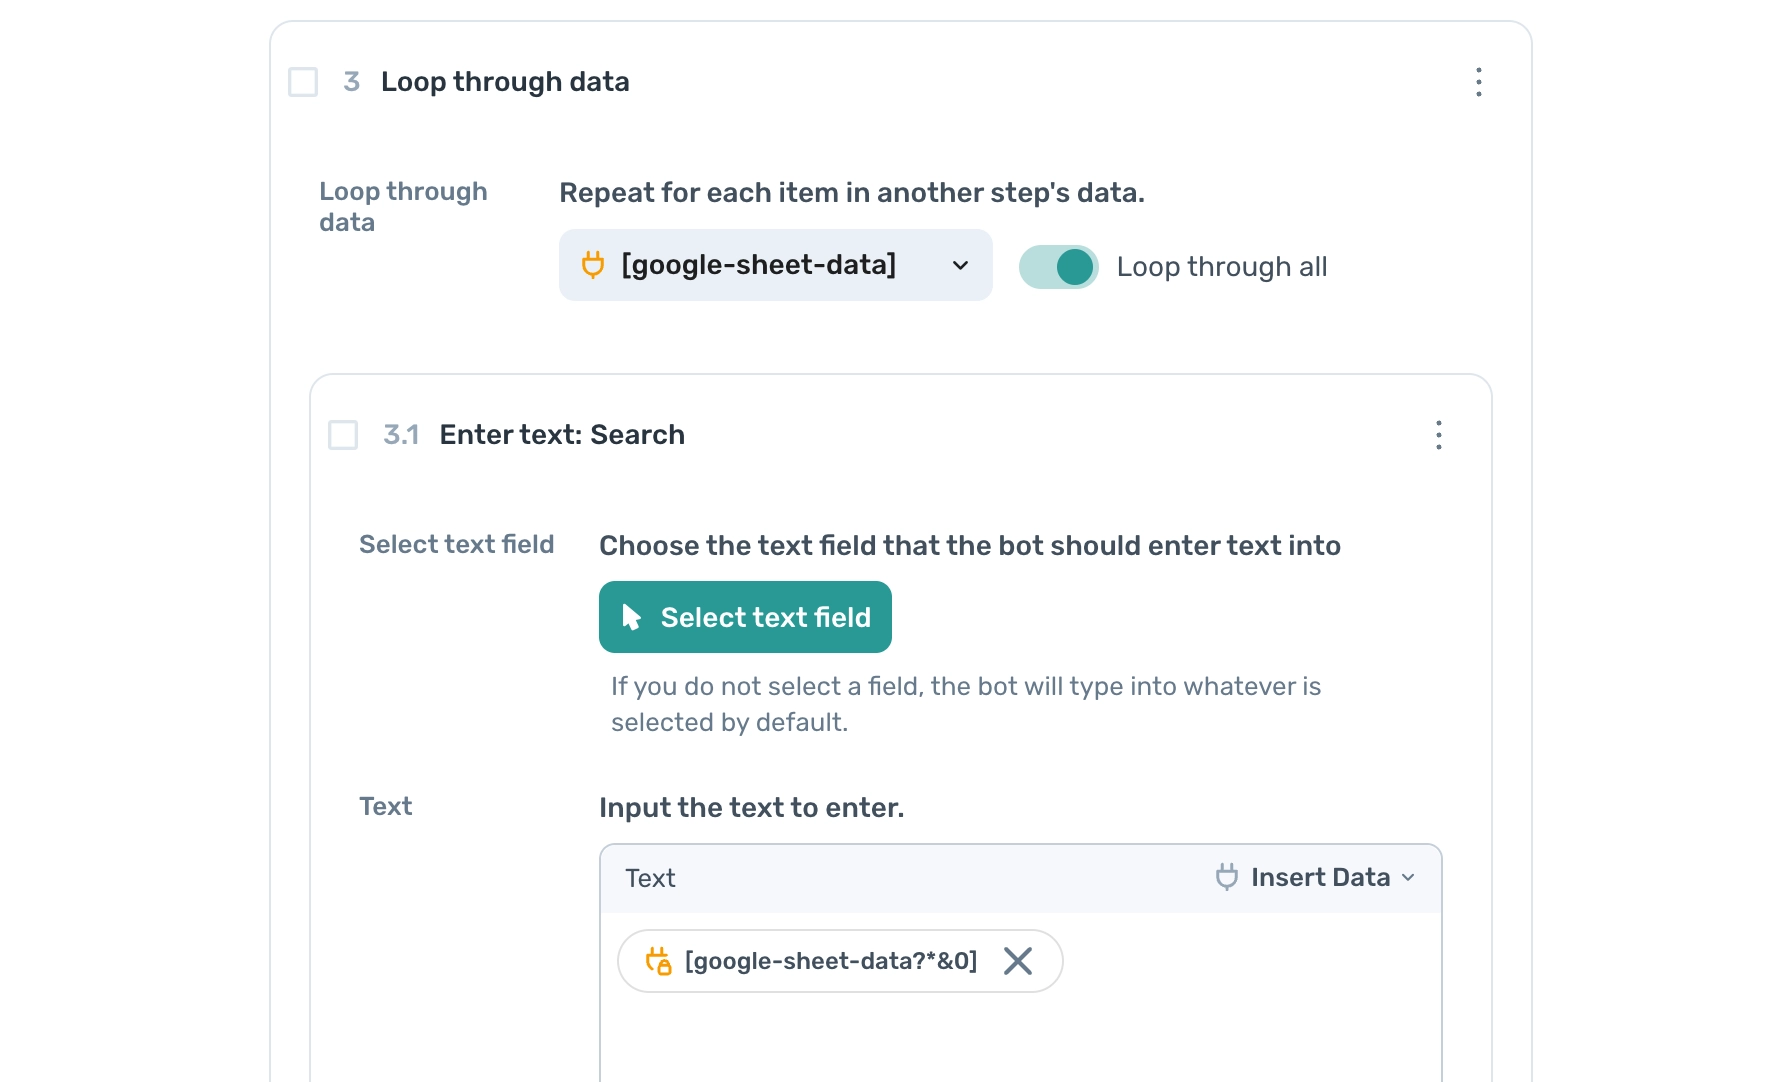
- Add a ‘Loop through data’ step.
- Loop through data: Click ‘Insert Data’ and select ‘google-sheet-data’. The loop step will now iterate through the URLs in the Google Sheet.
- Add an ‘Enter text’ sub-step.
- Text: Click ‘Insert Data’ and select ‘google-sheet-data’ to pass the search term from the sheet.
- Select column ‘A’ in the preview.
- Add a ‘Press key(s)’ sub-step to submit the search value.
- Key: Press ‘Record’, then ‘Return’.
- Add a ‘Get data from bot's current page’ sub-step to extract the data.
- Select: Click ‘Select’, then in the dropdown for column A in the selector tool, click ‘Custom Selector’. Enter the custom selector
#copyright_data_exploration tr td a.Then click 'Set selector' and 'Complete'. - Max Results: Set this to "All" or the number of results you want to scrape.
- Select: Click ‘Select’, then in the dropdown for column A in the selector tool, click ‘Custom Selector’. Enter the custom selector
- Add a 'Write data to a Google Sheet' sub-step.
- Spreadsheet: Select your Google Sheet.
- Sheet Name: Choose the tab where you want to write the links. In this case, the tab is called "Copyright Owners."
- Data: Click ‘Insert Data’ and choose ‘Scraped Data’.
- Write Options: Select ‘Add to Existing Data’ to append the new data without deleting the existing data.
- Add a ‘Delete rows from a Google Sheet’ sub-step.
- Spreadsheet: Select your Google Sheet.
- Sheet Name: Choose the tab containing the search terms.
- First Row to Delete: Leave this set to 1.
- Last Row to Delete: Leave this set to 1.
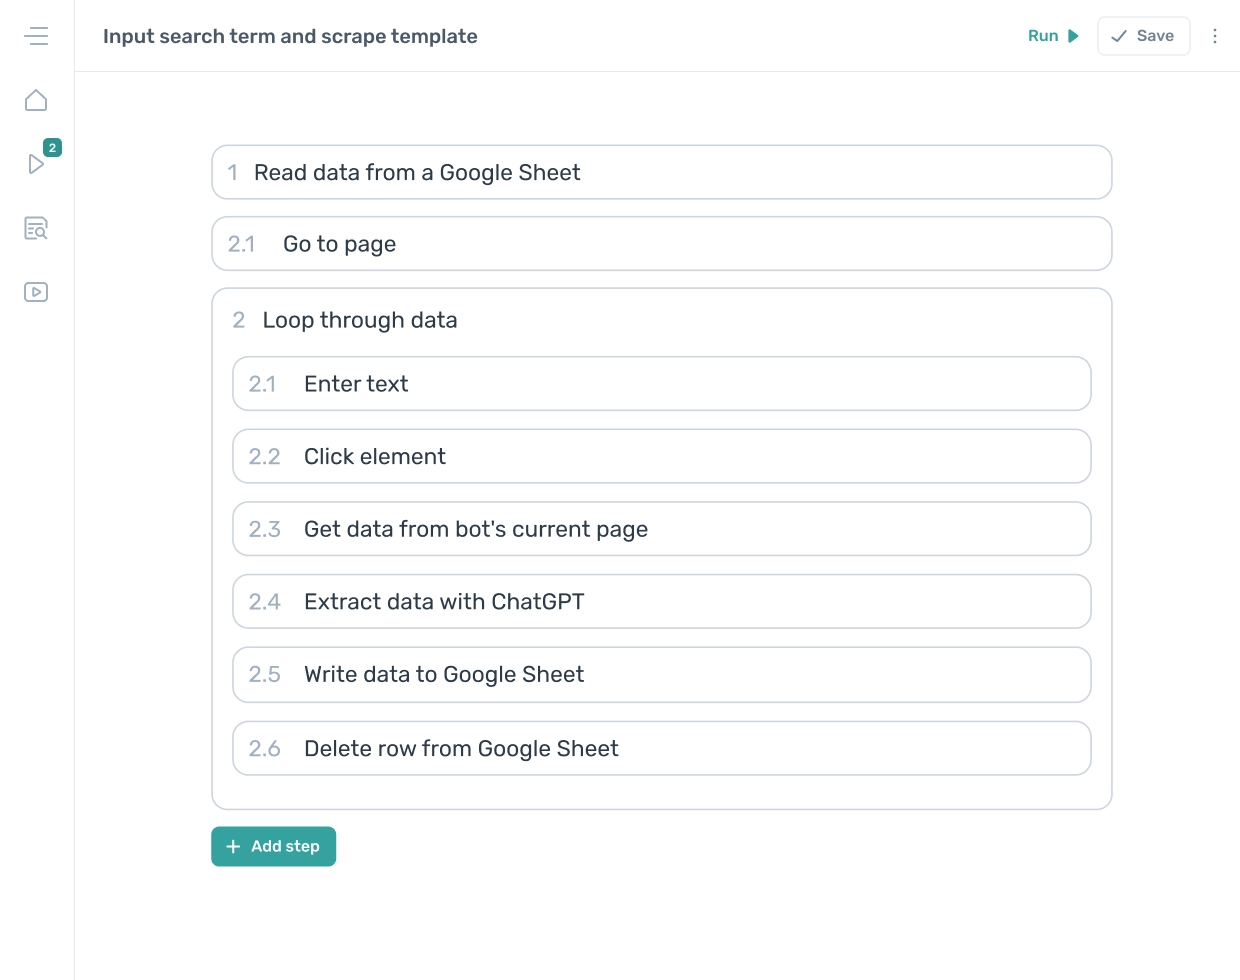
The web scraper will resemble the illustration below when complete.
# Building the second scraper to extract 'Copyright owners'
This scraper loops through the links extracted by the first scraper, extracting data from the owners' pages, including the specified domain and reporting organization tables. To get started, open Axiom.ai and click "New automation" to use the no-code bot builder for creating the Google scraper. Then, click "Add first step" to begin.
Download the template we created for this scraper. Click to learn how to upload it.
- Add a ‘Read data from a Google Sheet’ step.
- Spreadsheet: Search for the Google Sheet you created in the "Spreadsheet" field. Once found, click to select it.
- Sheet Name: Choose the "Copyright Owners" tab to import the links.
- Add a ‘Loop through data’ step.
- Loop Through Data: Click ‘Insert Data’ and select ‘google-sheet-data’.
- Loop Through Data: Click ‘Insert Data’ and select ‘google-sheet-data’.
- Add a ‘Go to page’ sub-step.
- Enter URL: Click ‘Insert Data’ and select ‘google-sheet-data’.
- Add a ‘Get data from bot's current page’ sub-step.
- Select: Click ‘Select’, then in the dropdown for column A in the selector tool, click ‘Custom Selector’.
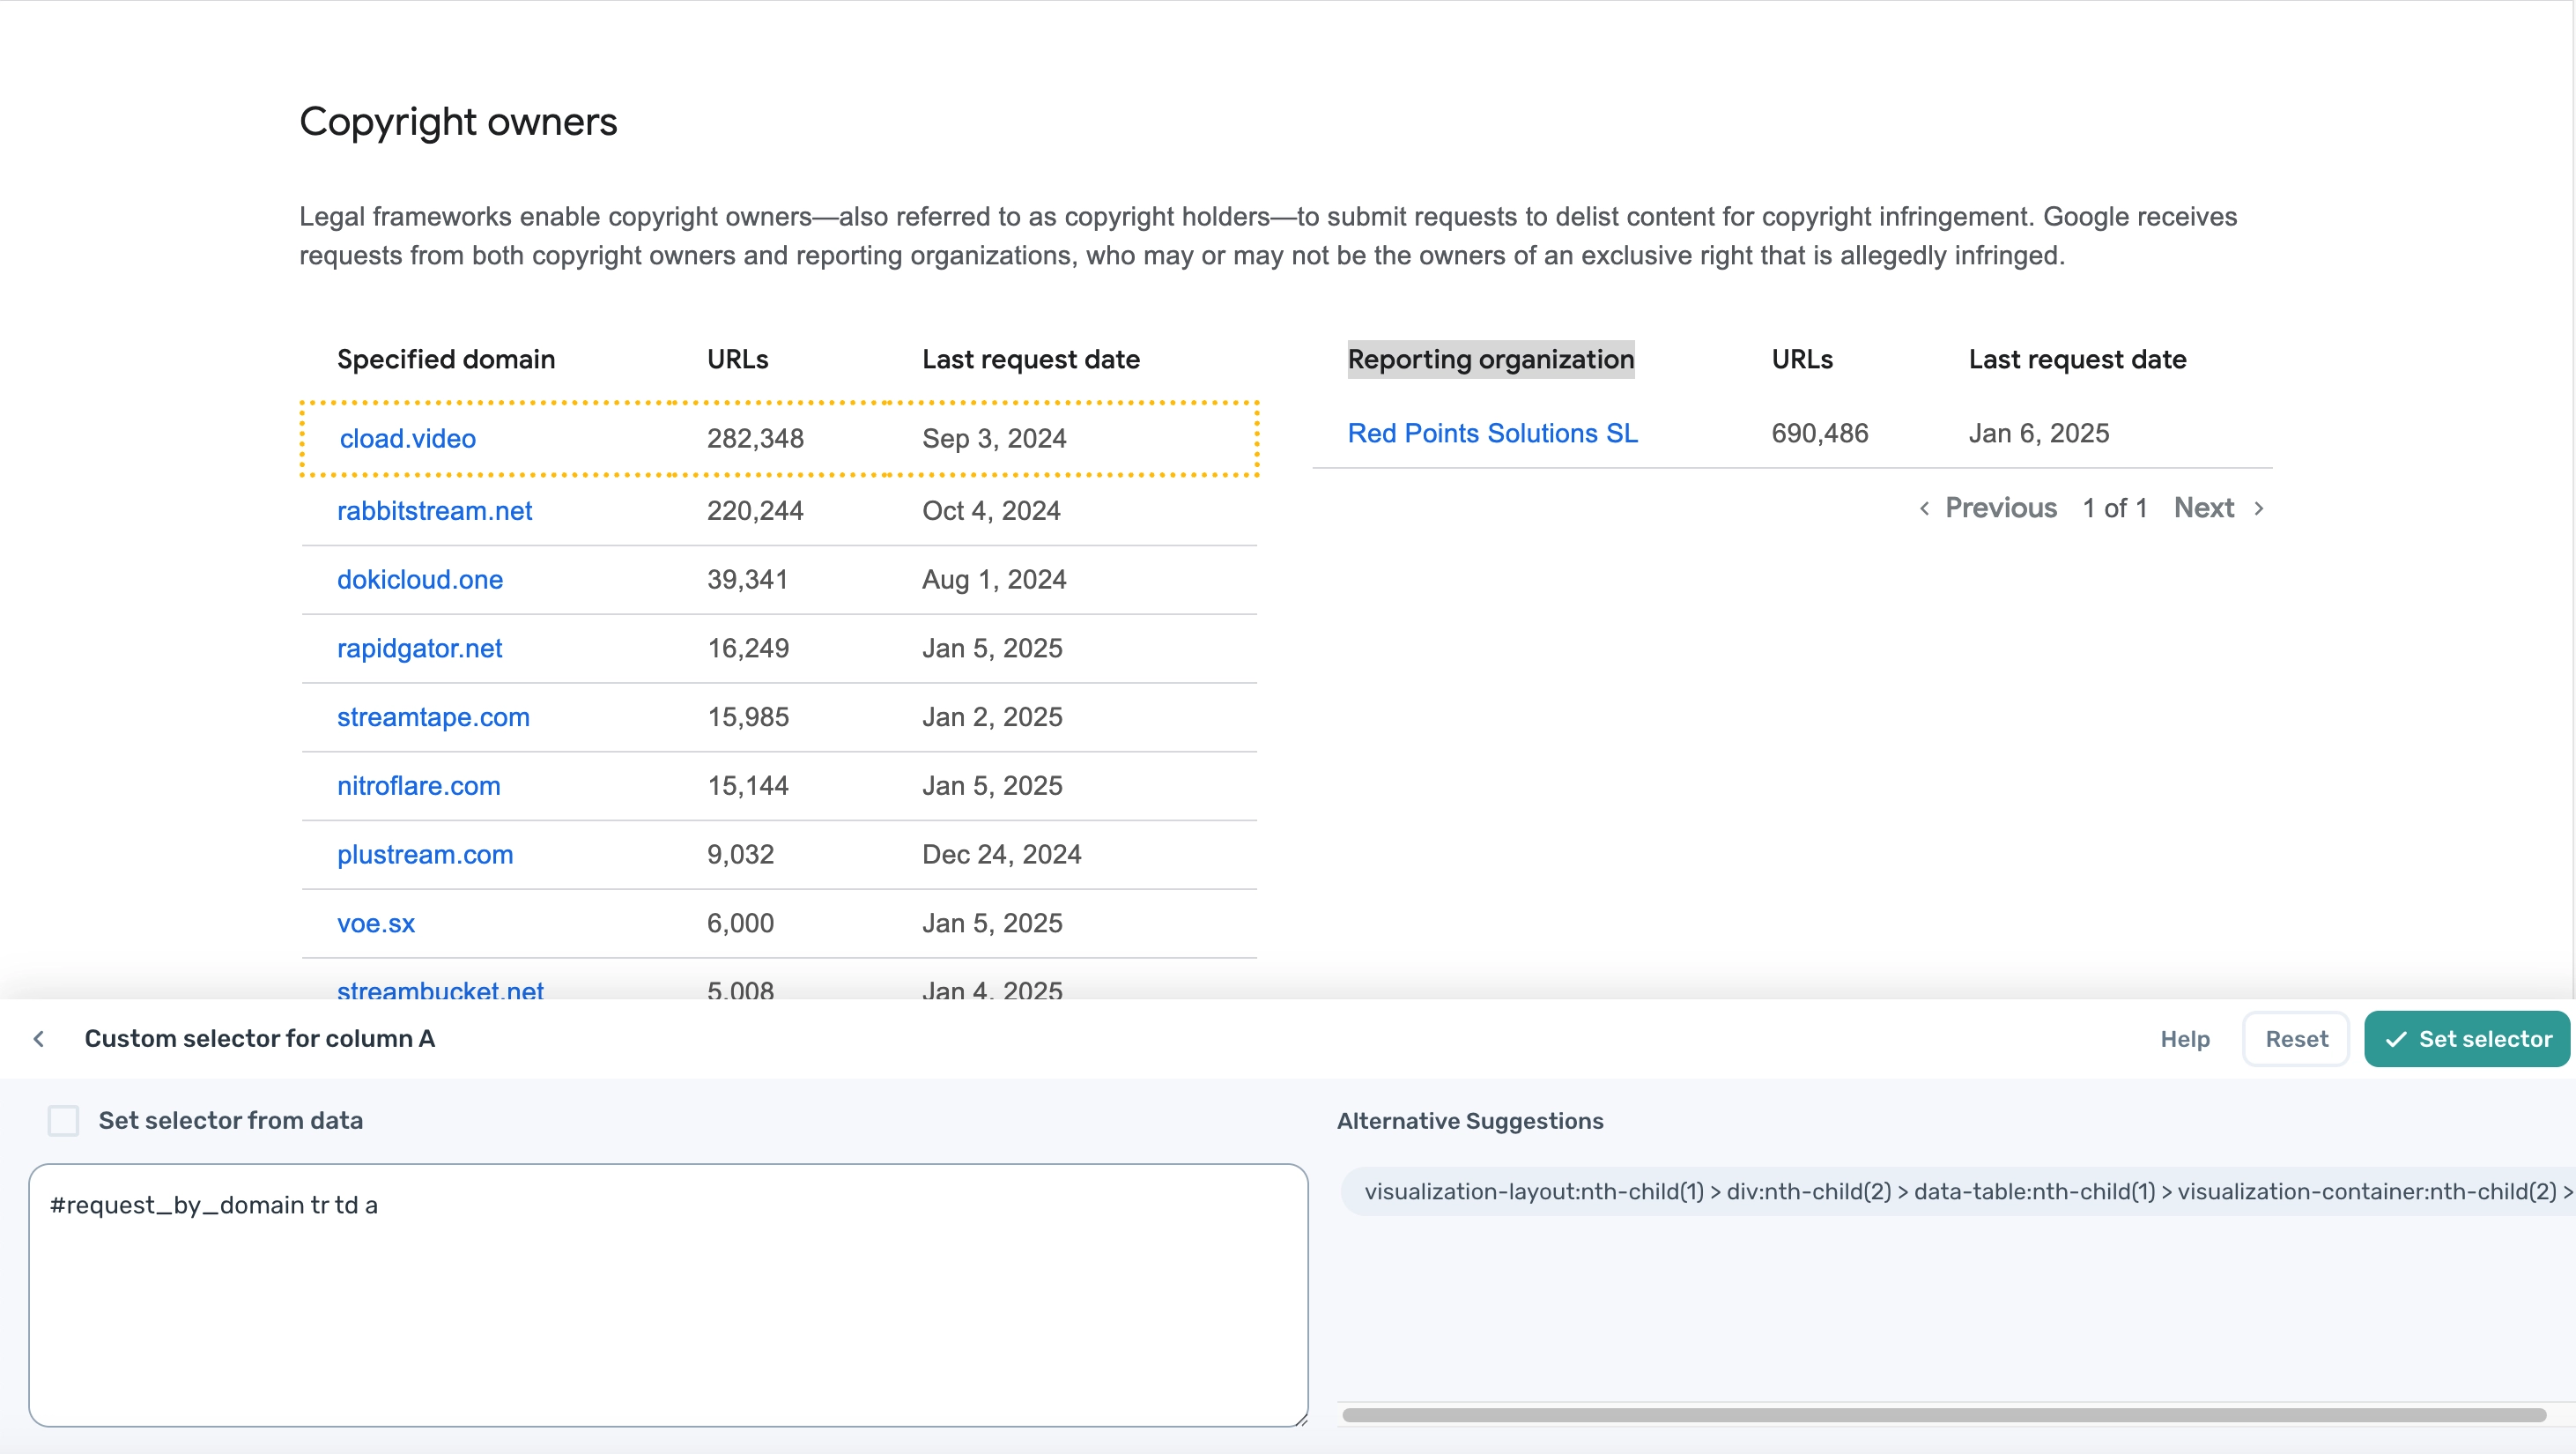
- Text field: Enter the custom selector
#request_by_domain tr td a. - Additional column: Add another column with the custom selector
#request_by_domain tr td:nth-child(2). - Click: ‘Set Selector’ and ‘Complete’.
- Find Pager: Click ‘Find Pager’, then ‘Custom’, and enter the custom selector
#request_by_domain pagination-filter a:nth-of-type(2). - Max Results: Set this to "All" or specify the number of results you wish to scrape.
- Add another ‘Get data from bot's current page’ sub-step.
- Select: Click ‘Select’, then in the dropdown for column A in the selector tool, click ‘Custom Selector’.
- Text field: Enter the custom selector
#request_by_owner tr td:nth-child(1) a. - Additional column: Add another column with the custom selector
#request_by_owner tr td:nth-child(2). - Click: ‘Set Selector’ and ‘Complete’.
- Find Pager: Click ‘Find Pager’, then ‘Custom’, and enter the custom selector
#request_by_owner pagination-filter a:nth-of-type(2). - Max Results: Set this to "All" or specify the number of results you wish to scrape.
- Add an Append or merge data’ sub-step, combing the outputs of the two scraping steps.
- Data A: Insert data
[scrape-data]. - Data B: Insert data
[scrape-data_1].
- Data A: Insert data
- Add an additional ‘Append or merge data’ sub-step.
- Data A: Insert data
[google-sheet-data]. - Data B: Insert data
[appended-data].
- Data A: Insert data
- Add a 'Write data to a Google Sheet' sub-step.
- Spreadsheet: Add your Google Sheet.
- Sheet Name: Choose the tab where you want to write the data.
- Data: Select the data to input into the Google Sheet by clicking ‘Insert Data’, then choose ‘appended-data’.
- Write Options: Select ‘Add to Existing Data’ to append the new data without deleting existing data.
- Add a ‘Delete rows from a Google Sheet’ sub-step.
- Spreadsheet: Add your Google Sheet.
- Sheet Name: Choose the tab containing the search terms.
- First Row to Delete: Leave this set to 1.
- Last Row to Delete: Leave this set to 1.
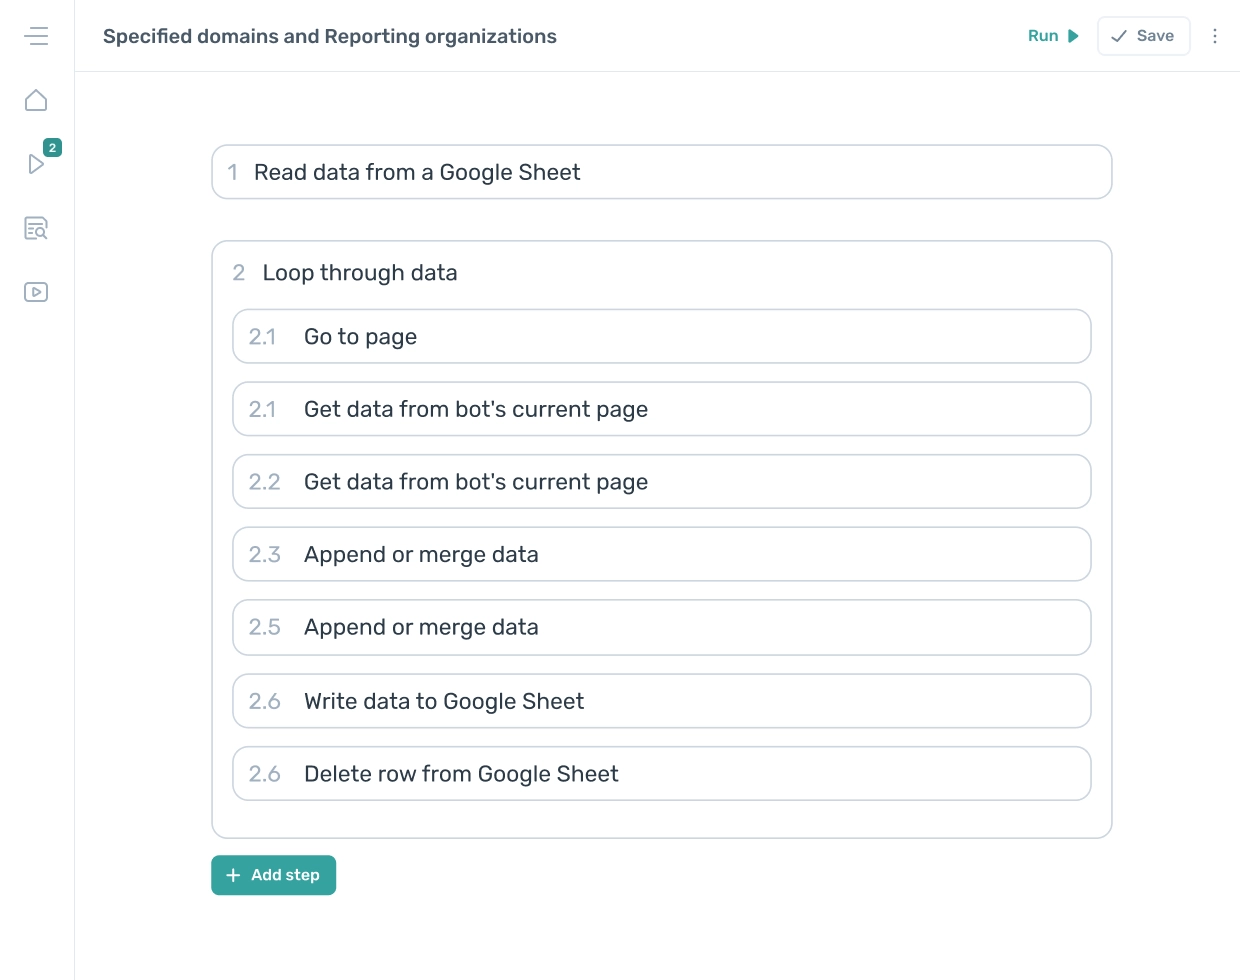
This second web scraper should resemble the illustration below when complete.
# Testing your Google Transparency Report web scrapers
Once you have saved your web scrapers, click "Run" within the Axiom.ai extension to start scraping. The scrapers need to be run in sequence, as the second scraper requires the URLs extracted by the first scraper.
If either scraper does not run successfully:
- Review any errors that appear in the builder or in your Run Reports.
- Check out the Common Errors section for details on frequent issues and how to resolve them.
# Wrapping up
The best practice for scraping links and then extracting data from those links is to use two separate scrapers, dividing the task into two steps:
- First Scraper: Extracts the links.
- Second Scraper: Extracts the data from the links.
During this process, we observed that when two similar tables were present on the page, a custom selector was required. On closer inspection, we found that each table had a unique ID. This allowed us to create specific and reliable CSS selectors that returned the desired results.
Click to download the first and second template featured in this guide. If you’re unsure how to upload it, watch this video.
Testing was completed on 1st of Jan 2025, features in Google or Axiom.ai may change from time to time and updates may need to be made.